5 Features You Should Be Using On Your Autopilot Fishing Kayak
By: Tyler Hicks
Who needs a manual? Not me! Especially when I get a new fancy toy like an AutoPilot kayak. Like many kayak anglers, when I get a new kayak I am more interested in getting out on the water and ripping lips not sitting down for a session with the owner's manual.
Fortunately for most anglers, the design of the iPilot remote is intuitive, so we can easily muddle through the basics and get fishing with little effort. Yet like so many other advanced technologies available to consumers, there are many features of the iPilot motor that are under-utilized by kayak anglers. This is a crash course in those features that might just make your day on the water a little fishier.
1. SPOT-LOCK MEMORY
The Spot-Lock feature might be the very reason you bought your AutoPilot. While your kayak fishing buddies struggle against current and wind you can peacefully relax and hold a position with the touch of a button in 10' or 100' of water. What few AutoPilot owners know is that you can actually store up to 16 waypoints on your iPilot remote and when within a 1/4 mile of those points you can have the iPilot automatically navigate you to these points using the "Go-To" button. If you have a favorite spot with structure, a current break, or maybe a favorite spot for intercepting migratory fish on the coast or in a river this feature might be useful to you.
How To Save a Spot-Lock:
- Press the Spot-Lock button on the remote.
- The information for the Spot-Lock location will show up on the display. Use the Menu Up and Menu Down buttons to find the Save softkey.
- To save the Spot-Lock, press the Left softkey to open the Save menu.
- The Save menu brings up a list of Spot-Lock memory locations. Press the Left softkey to save the Spot-Lock into the selected memory location.
2. SPOT-LOCK JOG
Another feature popular with anglers working along shorelines or across depth gradients is the Spot-Lock Jog. Spot-lock jog allows the kayak angler to move 5' in any cardinal direction when on spot-lock. Use the speed up (+) and down (-) to move forward or reverse or the Steer Left (<) or Steer Right (>) to move 5' in those respective directions. Once the kayak moves 5' it will re-engage spot-lock. In order to use this feature you will need to install a Minn Kota Heading Sensor.
How To Use Spot-Lock Jog:
- Engage Spot-Lock
- Use the Speed Down (jog backward), Speed Up (jog forward), Steer Left (jog left), and Steer Right (jog right) buttons to jog the Spot-Lock location 5 feet in the desired direction.

3. CRUISE CONTROL PRESETS
Anglers who participate in troll fisheries or who want to maintain a constant speed as they work a particular piece of water will find themselves using the Cruise Control function often. Cruise control allows the angler to maintain a constant speed no matter external forces such as wind or current. Anglers have the option of using the iPilot remote to program in two cruise control presets. Anglers may find this useful if they switch between two different troll fisheries or techniques that require different troll speeds.
How To Save a Cruise Control Preset:
- Engage Cruise Control and adjust the target speed to your desired preset speed.
- While the Presets are showing in the menu at the bottom of the display screen, press and hold either the Left softkey or Right softkey.
- A message will flash to confirm that the preset has been saved.
4. ITRACKS
Just like Spot-lock memory, your iPilot can store up to 16 tracks. Each iTrack can be up to 2 miles and leave a breadcrumb trail of points that once stored can be retraced start to finish or vice versa. The speed at which the motor retraces the iTrack is up to the individual angler or Cruise Control can be engaged. When set to Arrival Mode the kayak will go into spot-lock at the final point in the iTrack. As with spot-lock memory, you must be within a ¼ mile of the iTrack before it will the motor will auto-navigate to the iTrack. This feature is particularly useful for anglers following particular trolling lanes or those who work long linear features on the water such as reefs, shelves, or other structures.
How to Record an iTrack:
- Use the Menu Up or Menu Down buttons to find the Record softkey label at the bottom of the display screen.
- Press the Left softkey to select the Record menu.
- The Record Menu brings up a list of iTracks. Use the Menu Up and Menu Down buttons to scroll to one of the iTrack memory locations and press the Ok button.
- Once a location is selected, the current location of the kayak becomes the To Start location of the iTrack being recorded.
- Navigate your kayak along the desired path. AutoPilot and/or Cruise Control can be used while recording an iTrack.
- To stop recording an iTrack, use the Menu Up and Menu Down buttons to find and select the Stop softkey.
- The recording will end automatically if the two-mile distance limit is reached or if the Spot-Lock or Go-To button is pressed.
How to Navigate an iTrack:
- Manually navigate your kayak within a quarter-mile of the saved iTrack.
- Press the Go-To button on the remote to bring up a list of saved Spot-Locks, then press the Right softkey to bring up a list of saved iTracks.
- Use the Menu Up or Menu Down buttons to select an iTrack to navigate.
- Using the Left or Right softkeys select either To Start or To End. The kayak will navigate to the closes point on the iTrack and then navigate To Start or To End.
How To Reverse an iTrack:
- Use the Menu Up or Menu Down buttons to find the Reverse softkey label at the bottom of the remote display screen.
- Use the Left softkey to select Reverse.
5. AUTOPILOT MODE
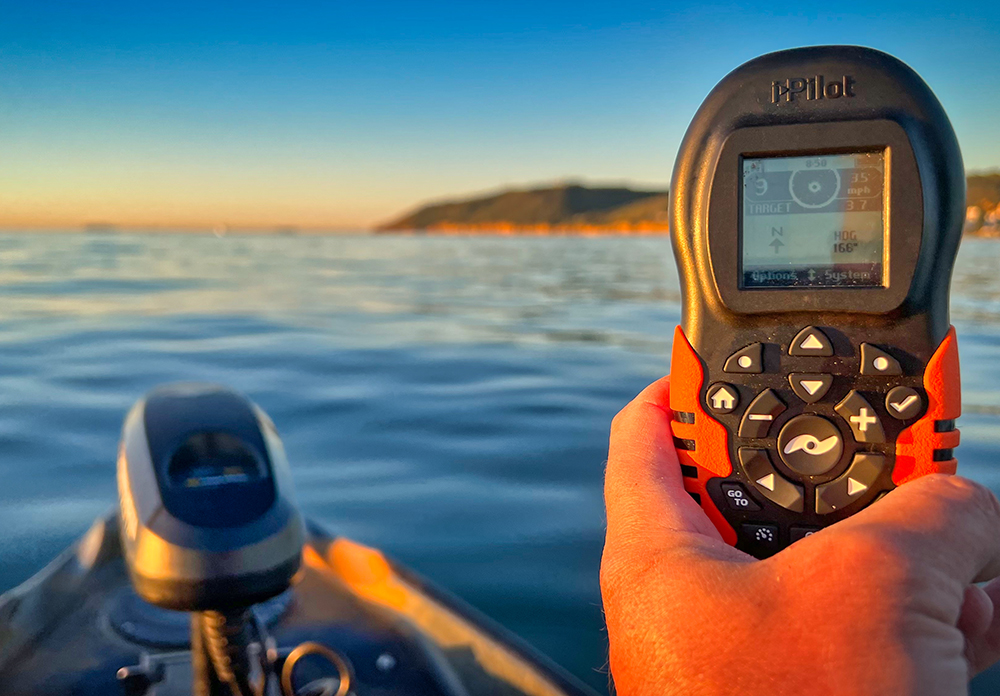
It's not just the name of your kayak, it's one of the most useful iPilot features available to kayak anglers. AutoPilot (sometimes referred to as Heading Mode or Heading Lock) keeps you headed in the right direction by intelligently and automatically steering your kayak. This feature uses a state-of-the-art compass system that locks onto a particular heading, and automatically and continuously makes adjustments to keep your kayak moving in that direction. This is particularly useful when "running" out to your destination through open water. Simply point your kayak and motor at your destination, press the AutoPilot button on your remote, and let the kayak do the work. This is a great time to rig and tie on our lures, snap a quick sunrise photo, or kick back and enjoy a cup of coffee. Even when in AutoPilot mode, it is important to stay alert and aware of your surroundings at all times.
How To Use AutoPilot Mode:
- Press the AutoPilot button on the remote
- The AutoPilot icon will appear on the display screen.
- To adjust the desired heading, manually steer the motor to the new heading. iPilot will automatically lock onto the new heading.
- Press the AutoPilot button again to disengage AutoPilot Mode.
IPILOT REMOTES AND MOUNTING OPTIONS
AutoPilot i-Pilot Remote: This is the standard remote that comes with your kayak. It is nearly identical to the iPilot remotes used primarily by powerboat anglers with the exception that it lacks the "High-Speed Bypass" option and is orange in color rather than black. For most AutoPilot kayak anglers this will be their primary remote. The AutoPilot kayak i-Pilot is necessary to use the advanced features above such as spot-lock memory, iTrack, and cruise control. Some anglers opt to carry this remote around their neck so they can use it when standing. It measures about 5.5" x 3". However, at nearly half a pound the remote can be tiresome to wear on long days on the water. Fortunately, the remote comes with a standard thread mount on the back that allows for easy mounting using options such as RAM mounts ball or tough claws to mount on the handle or track systems of your AutoPilot kayaks.
i-Pilot App for your Smartphone: The i-Pilot app can be downloaded from the Google Play or Apple app store to your smartphone. The app allows your phone to be paired with an iPilot motor and makes for an easy backup remote should you happen to forget your remote at home or your remote battery dies. The i-Pilot app lacks many of the advanced features of your standard remote but still has many of the key features including the heading and spot-lock feature but lacks features such as cruise control, iTracks, and spot-lock memory.
i-Pilot Remote Mini: Measuring just 3.25" long by 2.25" wide the i-Pilot mini remote weighs a quarter of the larger standard remote. The mini can be comfortably worn around the neck or attached to your PFD and comes with a quick-release lanyard. It's a great alternative to those that find the standard remote to be a bit too much or for myself I prefer to semi-permanently mount the standard remote and use this remote when I'm standing. The mini lacks many of the features of the standard remote but comes with spot-lock, heading (autopilot), and high-speed bypass as well as directional and thrust controls.


